The weather has been a mixture of wet and warm days with chilly nights....
Autumn smells purvey the forest...
The last of the summer sun glints through the turning leaves...
In between carving and looking after our chickens I have spent some time foraging about for some Autumn treats...
I have found quite a few Leccinum scabrum (Birch Bolete).
These are processed by carefully removing the pores from the upper flesh...
Leaving the edible flesh ready for cooking or drying...
Slice the caps into slim strips with a sharp knife...
I personally dry these morsels on kitchen paper left on a light windowsill. But I have been told by an old friend of mine that threading them onto a length of cotton and hanging over a heat source, a Rayburn for instance, is the way to go...
The Birch Bolete and other types of Bolete are a nice addition to any stew or soup.
But it is not my favourite.
Some years ago my French friend 'Alain' took me mushrooming up in the hills above his cob cottage in the South of France. He introduced me to, in my opinion, the most wonderful mushroom....
(Cantharellus cibarius.)
CHANTERELLE....
These butter yellow mushrooms are delicious.
I remember a long hard ride on my old sidecar from the French Alps to Alan's home in the southern part of France. I arrived at his home and was given a super warm welcome from both Nathalie and Alain.
They sat me down at the ancient table in their living room and fed me a meal fit for the most weary traveller.
These simple ingredients will delight the taste buds.
Chanterelle.
Fresh eggs.
Butter.
Salt.
Heat the butter in a pan and add the Chanterelle and salt, gently fry, add eggs and whisk.
Serve with bread and wine...
An absolutely delicious meal...
I've also managed to collect a quantity of Cob nuts and plums...

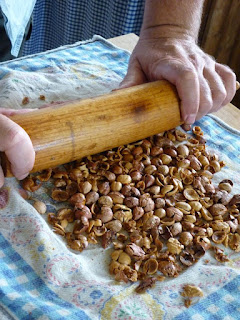
The Cob nuts need releasing from their shell. A tap with the poll of your Axe or a baton will crack the hard shell open...
Once you have them released from their shells they are ready to eat...
I like to roast mine...Remove the shells and pop them in an oven at about 150 degrees for a couple of hours. This should dry them and make them a little crunchy, also improving the flavour...
Sarah and I have a super recipe in which we use roasted Cob nuts...
GATEAU AU MARRON...
For this recipe you will need...
Roasted Hazelnuts....
8oz (225 g) Plain chocolate, chopped.
8oz (225 g) Butter, softened.
8oz (225 g) Unsweetened Chestnut purée.
8oz (225 g) Caster sugar.
1-2 Tablespoons Rum/Cognac.
To Decorate- grated chocolate, or cocoa powder and icing sugar...
Rub the roasted Cob nuts together to release the papery skins. Winnow out the skins by blowing over the tray.
(Outdoors is best)
Place the chocolate in a bowl over a saucepan of hot, not boiling, water and leave until the chocolate starts to melt. Stir the chocolate until it is smooth, then remove from the heat...
In another bowl, beat together all the remaining ingredients, except the grated chocolate or cocoa powder and icing sugar...
Stir in the chocolate...
Add the roasted and crushed Cob nuts...
then spoon into a loaf tin or ring mould...
Cover and leave in the refrigerator over night....
To Serve.
Dip the tin or mould briefly in hot water, place a plate over the tin or mould then, holding the tin or mould and the plate firmly together, turn them over and give a sharp shake. Lift the tin or mould away.
Sprinkle grated chocolate or cocoa powder and icing sugar over the top and serve sliced.
ENJOY...J
We know you will...J;-)
We know you will...J;-)


