Wednesday 29 June 2022

Carving a Dragon Kuksa.
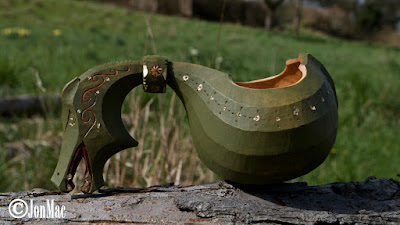

Carving a Dragon Kuksa. 

A hand carved Dragon Kuksa.


I have been carving Kuksa from green Birch for 15 years or so, I’m self taught. From the beginning, I limited myself to a handful of tools, Axe, knife and hook knife plus a few bits and pieces to keep everything sharp. I’m a hiker and hillwalker and the tools I use are portable and useful at camp. For some time I carved Kuksa with simple lines, but there came a time when I wanted to stretch my skills. I started to carve stylised Ale Hens and then applied what I learned from those projects to a more compact, small drinking vessel, a Kuksa. I added a few more tools to my pack, a small detail knife, a folding pull saw and a small length of Deer antler. All of my carvings, whether Kuksa or spoon, are undertaken “in hand” so no holdfast or vice are required. Now, the carve I am about to describe is a little more involved and will require a few more bits and pieces. Here’s a tool list.

Materials and Tool list.
Carving Axe. Nic Westermann
Carving knife (Scandinavian Grind). MiniMac
Closed form hook knife. Nic Westermann’s Finishing blade Small detail knife. Nic Westermann Small Chip Carving blade Pull saw. Silky Big Boy and Pocket Boy.
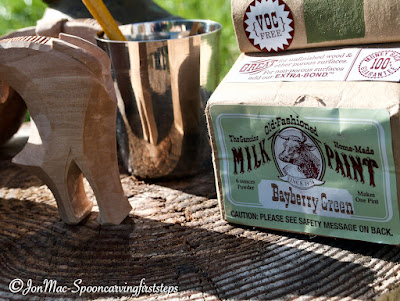
Green and Salmon coloured milk Paint. Old Fashioned Milk Paint. Gold leaf. Gedeo.
Gilding Paste. Pebeo Deco Vinage Effet Gilding Paste
2b Pencil.
Black wax pencil.
Dark red wax pencil.
Small paint brush.
A few wooden kebab sticks or match sticks. Compass.
Tung oil. Liberon.
Cheap brand Blu Tack.
Clean green Birch.
A carving stump.

The kit list includes cheap brand Blu Tack, use this for removing pencil marks. The cheaper brands seem to be a little more effective. The kebab stick or sharpened match stick is used for dabbing gilding paste into eye sockets, nostrils, bowl rim and collar decoration. The gilding paste is used to glue on the gold leaf. The Tung oil is to seal the carve once completed. The main carving tools are self explanatory. At any time during the carve, up until the salt water boil, you can pop the carve into a bucket of water or a stream overnight to keep the carve wet which will inhibit cracking. Carve in the shade and don’t let the carve dry too quickly.

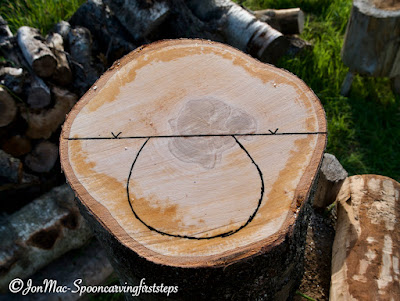
The first thing you’ll need is a length of clean ( no knots ) Birch or similar suitable wood approximately 6” to 8” diameter and 8’ long. Split in half lengthways making sure one half is free of knots. From this billet you need to Axe out a teardrop shape, first Axe the neck then round off the back and underside of the bowl. Reduce the size of the blank until it fits comfortably in your hand. Leave a little wriggle room on the blank to allow you to centre up and add details later on.


Carving a kuksa. Marking out


Marking out a Kuksa


Marking out a Kuksa


Carefully Axe out a ‘V’ cut to allow the neck to be formed at a point measured from the rear of the bowl equal to the width of the bowl, Axe out the top of the bowl to allow for a sweeping bowl rim. Once you have started the ‘V’ cut for the neck and have achieved a suitable depth, switch to using your knife and start forming the neck shape. For ease of description we’ll call this the inner neck. Use sweeping curved slicing cuts.


Carving a Kuksa handle


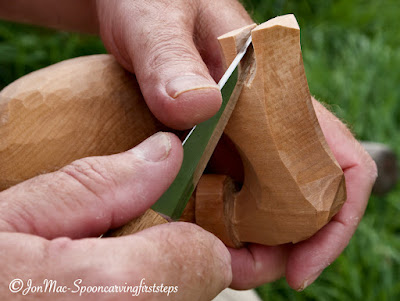
You will soon encounter a problem with grain direction half way along the neck. To obviate the issue where the grain from the head end and body end coincide, make two stop cuts with your knife approximately 1/2 “ apart and form a collar where the two grain directions meet.


Carving the collar on a Dragon Kuksa


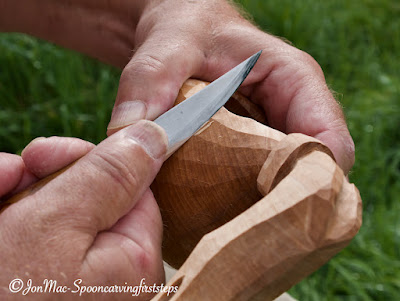
Use sweeping cuts with your knife set at 45 degrees across the grain to form the first stage of the inner neck, don’t forget that there is a secondary stage to the inner neck which forms the lower inner jaw. Again, use sweeping cuts. During these manoeuvres start working the knife over the complete work, tidying the Axe cuts and centring everything up. Use your eyes and touch to make the shape pleasing, also consider chamfering the rim of the bowl as the inner bowl will be undercut to follow the overall shape of the outer.


Carving a Dragon Kuksa's neck


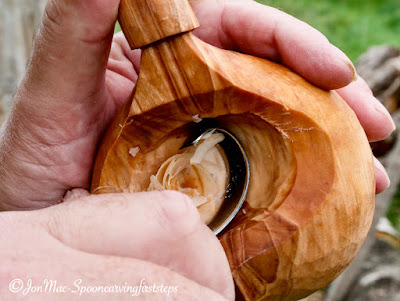
With your hook knife, start hollowing the bowl. This will take some time, just be patient and keep your hook stropped. Use the hook across the grain to begin with and change the orientation of the hook, shown in the next two photographs.


Carving the bowl of a kuksa


Carving a kuksa bowl

Once the inner neck reaches completion you can now pay attention to the Dragon’s face, this is formed using the same sweeping cuts with the knife set at 45 degrees across the grain. Don’t be afraid to saw away any excess wood with your pull saw before you start, there will undoubtably be some. You will now pay attention to the sweep of the Dragons neck from the collar, over the top of its head and down to its face. The sweep needs to be graceful and higher than the lip of the bowl, you should have enough space to lower the bowl lip if need be.


A partially finished kuksa


Once you have the Kuksa hollowed with a wall thickness of approximately 1/2 “ on the lower wall, tapering to 1/4 “ at the rim, stop.......

The next step has no accompanying photos. You’ll need a saucepan or pot big enough to accommodate the Kuksa. Pop the Kuksa in a pot and cover it with water, add three or so tablespoons of salt, pop the pan on the stove and bring the water to the boil, simmer the Kuksa for an hour or so. The water should take on a light brown colour after a time. Remove the Kuksa and let it sit over night. In the morning the Kuksa should be cool but wet to the touch, dry the outer with a towel and start carving the planking, you’ll find fairly dry wood quite quickly.

To make the planking effect, start at the lip of the bowl and carefully, with your knife, plane a flat edge starting from the Dragons collar running right round the bowl back to the collar. Tidy this first plank and move down to the next. It will soon become obvious that you can tidy up the width of the first plank by altering the top of the second plank. Keep moving round the Kuksa, adding planks as you go. You may find that the Kuksa is still a little damp, you can go over the planking once more with a re sharpened knife later on when dryer.

Carving the planking on a dragon Kuksa

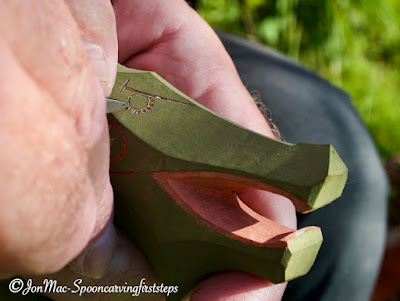
Next, cut out the Dragon mouth starting with a ‘V’ cut and carefully working the opening with twisting cuts using the tip of your knife. Note later photographs where you can see I’ve left a triangular tooth like shape at the mouth opening.


Carving a Dragon Kuksa, the mouth


You can also start cutting in the Dragon horns at the top of the head. Make them simple and not too fragile.


Carving horns on a Dragon Kuksa


You will now need to re visit the bowl inner, cleaning it up and introducing the undercut at the lip. Once you are happy with the undercut, you can start to tidy the rim of the Kuksa. Once the rim has been tidied up, it is difficult to re visit the inner as you will damage the rim in the process.


Overview of the undercut on a kuksa bowl


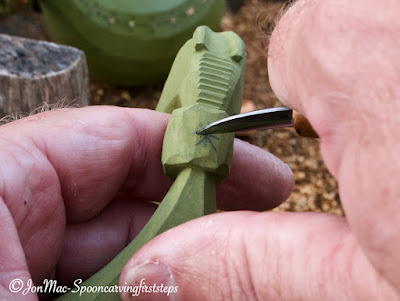
You’ll need to cut in its mane using tiny ‘V’ cuts and pop a little detail around its mouth using your chosen detail knife. You might also want to add a little scalloping around the collar, do this with your small detail knife making a dish shaped cut.


Carving the mouth detail on a Dragon Kuksa


Carving the grip into a kuksa handle

You should now have the basis of a Dragon Kuksa which will need a few bits and pieces of detail adding before it gets a coat or two of paint. The Kuksa will still be “Green”, however, boiling it in salt water will speed up the drying time and relax the wood. So wait a week or so before painting and oiling

Once you’ve tidied everything up and the Kuksa is dry, you can commence painting your Kuksa with milk paint. Be sparing as you don’t need a large amount, a tablespoon or two of warm water should get the job done. Mix in the powdered paint a teaspoon tip at a time to make a watery wash. Follow the instructions that come with the paint, but don’t make it too thick.


milk paint


Painting a kuksa with milk paint

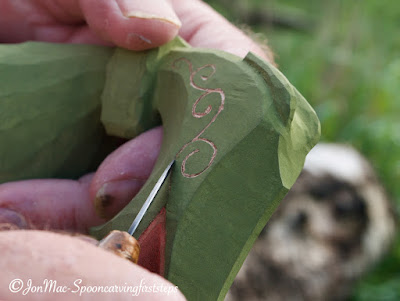
Once you’ve mixed, start painting the outside of the Kuksa only, leave the inner natural. Brush on a thin coat and leave it over night. Add a second coat and leave to dry, then mix up a little Salmon coloured milk paint and paint the inner part of the mouth. Again, leave to dry and add a second coat when ready. Once dry you’re now set to mark out its flames, eyes, nostrils and other decoration you may wish to add. Once marked out with your 2b pencil, employ a ‘V’ cut following the marks.
Use a wax pencil to mark up the flames and face detail.


Adding decoration to a Dragon Kuksa


Adding decoration to a Dragon Kuksa


Carving the eyes for a Dragon Kuksa

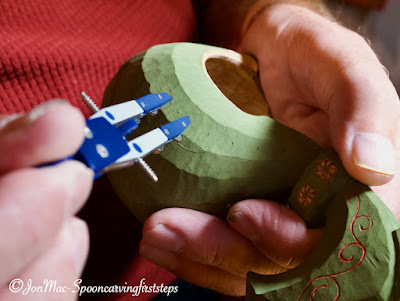
You may wish to add some chip carving around the collar and a little decoration around the rim of the Kuksa. Use a compass to mark out the rim decorations, usually the second plank down is best. Mark around the rim leaving enough space between marks to add some stab carving in between. The compass marks can then be made permanent by using a round ended bone or antler pressed into the wood. Make the triangular stab cuts with the point of a Scandinavian ground blade.


Marking out decoration on a Kuksa


Making decorative indents on a kuksa carve


Decorative carving on a Dragon Kuksa

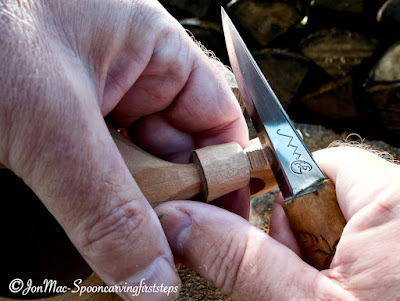
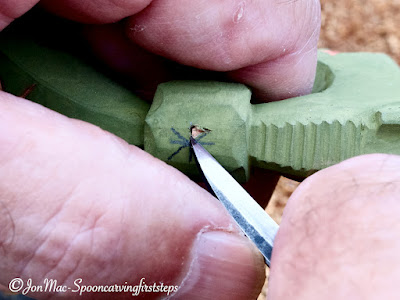
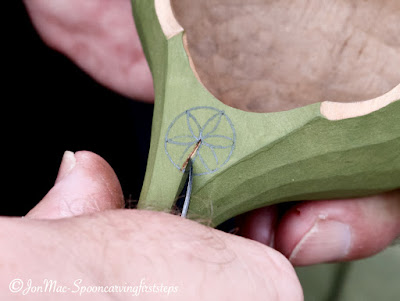
The decoration on the collar is made by marking out a small eight tipped star shape, using your small detail blade you make three cuts. The first from tip to centre, rocking the blade in.


Chip carving detail on a Dragon Kuksa


The second from tip to the adjacent tip, again with a rock in motion.


Chip carving detail on a Dragon Kuksa


And the third is a slicing motion to remove the chip.

Chip carving detail on a Dragon Kuksa


The design on the top of the bowl is relieved in a similar way with a long vertical centre line cut

and two sweeping cuts on both sides.

Chip carving detail on a Dragon Kuksa


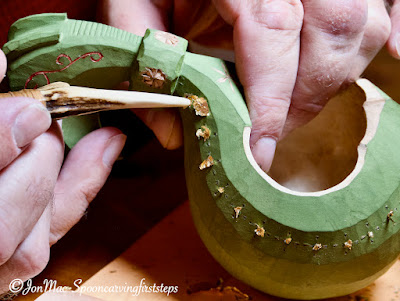
The next step is to add your gold leaf. With the point of a kebab stick or sharpened match, drop a spot of gilding paste into the dents you made around the rim, pop some on the teeth and the little scallops you made around the collar. Let it dry so it’s sticky to the touch, then with your trusty antler apply the gold leaf. Just lick the tip of the antler to pick up the leaf. It’ll look messy at first, press it on with clean fingers and let it dry. Once dry, brush the excess away with a soft brush.


Gold leaf on a Dragon Kuksa


Gold leaf application on a kuksa

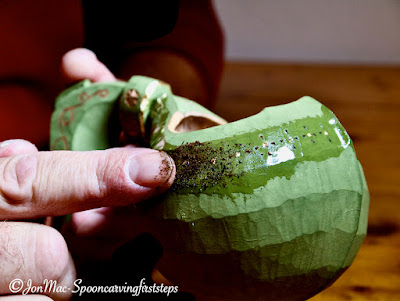
The final thing now is to find some fine ground coffee beans, or fine ground dry coffee grouts. With your finger or a rag, oil over the band of stab carving around the lip of the Kulsa, then rub the grouts into the oil, wipe off and you should be left with little black triangles surrounding your gold leaf dots

Kolrosing on a Dragon Kuksa

Now coat the whole Kuksa with Tung oil, let it soak in and wipe away any excess. Leave it to dry for a couple of days and add a second coat, wipe off excess and let it dry.
You should now have a beautiful Dragon Kuksa made by your own hand.


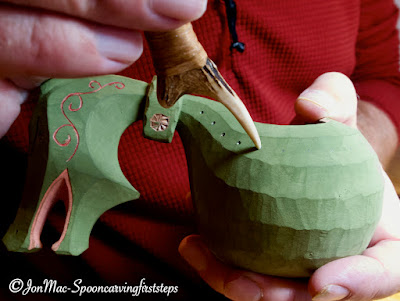
A Dragon Kuksa carved by Jon Mac


A Dragon Kuksa carved by Jon Mac


These Kuksa are drinking vessels, they will take a drink of water, spirit or ale.
I do have Kuksa that will take a drink of hot coffee, but be warned, the heat can be damaging, in which case, a good reason to carve another.
This instructional took a while to put together. Do me a favour and restore my faith by buying me a coffee, you'll find a donate button on the right. 
Thank you.

Enjoy... J 

Tuesday 16 February 2021

Hand carved Birch Dragon Kuksa.


Hand carved Birch Dragon Kuksa carved by Jon Mac using Axe, knife and open hook. The Dragon has been given chip carved and kolrossed decoration along with the addition of gold leaf highlights. The paint used is 'milk paint' and it's finished with Tung oil. The Dragon sits atop various Birch spoons, some carved with Axe and straight knife only. A technique I've been experimenting with for the last few years. I'd also like to mention that www.spooncarvingfirststeps.com passed 1000000, yes one million hits. Thank you all.... J


Wednesday 10 July 2019

KuksaCamp. A brief overview.


We've been busy here at Spoon Camp.
The sun has been shining and we've had a steady stream of wonderful students.
We will be striking camp the week after next when we'll be moving up to Scotland and the Scottish Crannog Centre.
I will be available for spoon carving courses at the Crannog on the 29th 30th 31st July 1st August and the 6th August. Contact the Crannog or email me at jonmacbookings@gmail.com to secure your place. 

A one day spooncarving course will cost £80 per day.

See you there... J


kuksa-carving
Pete gets acquainted with Kuksa carving.

Sarah and I will be back in the Shire and available for courses around the 1st September.
Drop me a line at jonmacbookings@gmail.com with your available dates and we'll make sure to adapt a course to your liking. 

chip-carving.spoon-carving
Jon Mac demonstrates a spot of chip carving.

spoon-carving
Rebornferal (Martin) carves at Spoon Camp.

spoon-carving.spooncamp
Martin (rebornferal) starts his knife work.
A photograph Martin took of my working knives.
Top to bottom.
My MiniMac carver.
My Typhoon Bushcraft knife.
A utility/splitting knife.
My favourite camp knife and food prep knife, the Macro.
And finally, the Grandfather MaChris bushcraft/carver.

bushcraft-knives.jonmac
Jon Mac's carving and camp knives.

 This wee lightweight Axe made by James Wood was a pleasure to use.
Go visit his web site to find his stock line.

jonmac.james-wood-axe
Jon Mac using a James Wood Axe.

Spoon-camp.Kuksa-camp.spooncarving.tentipi
Spoon/Kuksa Camp.


Kuksa-camp
Lunch at KuksaCamp.

Kuksa-carving.jonmac
Jon Mac hollows out a Kuksa at KuksaCamp.

kuksa-carving
Martin chip carves his new Kuksa.

jonmac.nic-westermann-detail-knife
Nic Westermann detail knife.
kuksa.tentipiadventuretents.tentipi
Jon Mac's stock at Spoon Camp.
 Linda came all the way from New Zealand.
She's an accomplished beginner and thoroughly enjoyed her course. 
spoon-carving-camp.spoon-camp
Linda and I stop for a brew.

jonmac-froe
Splitting with a froe.

Jonmac.kuksa-carving
Hollowing out a Kuksa with a hook knife.

jonmac.spooncarver
I've gone and snapped my beetle.

spoon-carving
Peter hard at it.
 Martin is a skilled Bushcrafter who goes by the monica ( rebornferel ) on Instagram.
What an enthusiastic young man !
kuksa-carving
Martin gets in close whilst finishing his Kuksa.
 Martin took a photograph of my very first Kuksa alongside my latest.
I think I'm making positive strides.


kuksa.
My first and latest Kuksa.
 Peter is a Forest School instructor and decided to spend longer with me than he originally planned.
We carved Kuksa and spoon, we also touched on the sharpening aspect of carving.
kuksa-carving-with-jon-mac
Jon Mac and Peter discuss Kuksa shapes.
 Our Tentipi and Canvas Camp shelter here in the Shire.
We try and make the orchard as welcoming as possible.
We can accommodate a small group of camping carvers here. We'll even lend you our older tipi.
tentipi
Kuksa/spoonCamp.
 Mish and Derek.
What fun characters these two were.
We have two new friends .
spoon-carving
Mish and Derek show off their newly carved spoons.

spoon-carving-courses
Mish and Derek with Jon Mac.

spoon-carving
Martin hard at work.
Don't forget to email me if you wish to learn more about spoon and Kuksa carving.
Enjoy... J


Carving a Dragon Kuksa.

Carving a Dragon Kuksa.  I have been carving Kuksa from green Birch for 15 years or so, I’m self taught. From the beginning, I limited mysel...