Saturday 5 May 2012

Eagle Kuksa...


Well, it was back to the chopping block last week.
Folk from near and far have ordered treen.
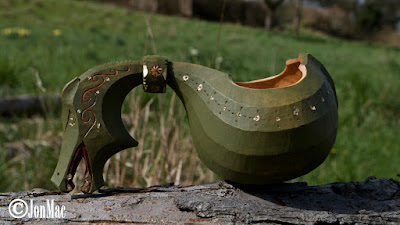
I was asked to make a Kuksa that is slightly different to my normal fair.
And I think it worked out fine.

Kuksa Jon Mac spoon carving first steps

He is carved from a piece of Sycamore gifted to me a few weeks ago.

Kuksa Jon Mac spoon carving first steps

And finished with a little Liberon Tung oil.

kuksa spoon carving first steps

The bowl is knife finished inside and out.
Whilst the head is sanded.
I have weaned myself away from abrasives on the whole, but sometimes a good smooth finish is desirable.
I keep a stash of Abranet in the draw for just these occasions.
I have also made a spoon for my good friend Magali, who is a superbly talented maker of the traditional French Laguiole knives.

spoon carving spoon carving first steps

Again, the bowl is knife finished and the handle has been sanded.

spoon carving spoon carving first steps

Hopefully I'll be receiving a parcel from Scotland soon.
I'll let you know what it is when it arrives.
Until then....
Enjoy.
J.


Sunday 29 April 2012

Pimp my poncho liner...


spoon carving first steps MaChris bushcraft knife

Here's a job I've been meaning to carry out for quite a while now.
I wanted to put a hole in the middle of my poncho liner so I could actually wear it under a poncho.
For me, cutting holes in things takes a little contemplation...
So after three years of thinking about it I decided to take the plunge.

spoon carving first steps

So first thing I did was find the center of my proposed slot, folding the liner in half and then marking the center with a marker.

spoon carving first steps

A 14 inch slot would suffice.
Marked up and ready for the scissors...

spoon carving first steps

Here we go then...
I take the plunge and snip the slot with some sharp scissors.


Some big old ' Homeward bounders ' will keep the three layers of material together whilst I work .

spoon carving first steps

Next I cut some tape that I could stitch over the cut edges.

spoon carving first steps

Folded in half along it's length and tacked on.

spoon carving first steps


spoon carving first steps

The next decision was whether to sew by hand.... Ooooor....Get the machine out.

spoon carving first steps

I wanted to get the job done fast so I went for the machine.
Here the tape is stitched on and I have added two short lengths of tape at each end to give some strength.

spoon carving first steps

Plus four longer lengths of tape with which I can close the slot when using the liner as a blanket or sleeping bag.

spoon carving first steps


spoon carving first steps

Here's the liner tied into a U.S Army lightweight poncho.

spoon carving first steps

And our wonderful model sporting the new spring look poncho...

spoon carving first steps


spoon carving first steps

I have always favoured kit that can be employed in more ways than one.
My new improved liner can now join some of my favourite equipment.
I guess the next job is to run a long zip around an end and two sides so I can make a nice snug sleeping bag.
Perhaps some other time...
Enjoy...
J


Carving a Dragon Kuksa.

Carving a Dragon Kuksa.  I have been carving Kuksa from green Birch for 15 years or so, I’m self taught. From the beginning, I limited mysel...