Monday, 4 July 2011

Hen and Chips...


kuksa  spoon carving first steps

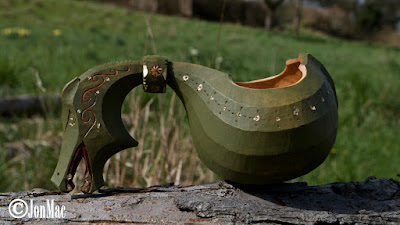
Recently I have been carving  Ale hens.
These hens are simple to make, and once you have confidence you can make them as stylised as you like...
I have decorated some of my hens with a very simple line of chip carving.
Using the back of the knife gently score a guide line around the cup.
You can just make out the scratch in the photograph.

chip carving spoon carving first steps

Then push the tip of a very very sharp knife into the wood at the top of the triangle. If you have trouble sharpening your knife then head off to the art shop and buy a scalpel. The scalpel tips are fragile so be careful. The blade must be angled toward the bottom left of the triangle...

chip carving spoon carving first steps

And keeping the blade point in the top of the triangle rock the blade toward the bottom left...

chip carving spoon carving first steps

Pull the blade out and replace the tip at the top of the triangle.
 This time the blade must be angled toward the bottom right of the triangle...

chip carving spoon carving first steps

And rock the blade down...

chip carving
Now the tricky bit...
Carefully push the tip of the blade into the triangle, at a slight angle. Push until your knife tip has reached the pinnacle of the triangle...

Spoon carving+jonmac+firststeps+kuksa+spoon spoon carving first steps

Once you think you have cut the wood fibres up to the pinnacle, swing the blade to the right...

chip carving spoon carving first steps

The chip should easily come free...

chip carving

Done !

chip carving spoon carving first steps

I have seen some extremely ornate chip carved treen.
This is the start point...

kuksa chip carving spoon carving first steps

I use the same three cut technique to form the eyes...

kuksa chip carving spoon carving first steps

And with a hot nail I burn in the pupils...

kuksa chip carving spoon carving first steps

The finished Hen...

kuksa spoon carving first steps

Not quite...

chip carving spoon carving first steps

Now Dolly says it's finished...

kuksa chip carving spoon carving first steps

I'm sure you're going to have fun with chip carving...

kuksa spoon carving first steps

ENJOY...J

Wednesday, 15 June 2011

Kuksa carving tutorial. Ale hen.

Ale Hens...

 spooncarvingfirststeps+jonmac+kuksa+alehen+spoon+carving spoon carving first steps

A pictorial tutorial...

spoon carving first steps

A short while ago I ran a couple of spoon and Kuksa making courses up here in Hennock. I explained and demonstrated techniques for sharpening Axe, knife and the dreaded hook knife. And showed them how to hold and properly use a MaChris carving knife. My students took it all in their stride and,at days end, and after some good hard work , they managed to get most of the Axe and exterior knife work completed. They spent the next couple of days hollowing out and knife finishing the work, they live near-by and were able to pop in for further tuition as they progressed. Whilst watching and helping my students, it occurred to me that my Kuksa design I have worked with for many years may be a little tricky to the novice carver...

spooncarvingfirststeps+jonmac+kuksa+alehen+spoon+carving spoon carving first steps

The beaver tail, cutting across the grain, is both hard and delicate work...

spooncarvingfirststeps+jonmac+kuksa+alehen+spoon+carving spoon carving first steps

I had a good think about the problems my students  encountered and decided to try out a different design. I cannot lay claim to this design as it originates from the cold north, an ancient design from Norway.

spooncarvingfirststeps+jonmac+kuksa+alehen+spoon+carving spoon carving first steps

A split billet...

spooncarvingfirststeps+jonmac+kuksa+alehen+spoon+carving spoon carving first steps

I made Hens both with a billet in the whole and a billet cleaved in twain. The whole billet tended, as I imagined, to split at the heart. A little bees wax mixed with Tung oil sealed the cracks and my friends have drunk long and hard from them without any mishap. I would therefore  recommend using a split billet as the chances of splitting are much reduced...

With your Axe remove the corners of the billet...

spooncarvingfirststeps+jonmac+kuksa+alehen+spoon+carving spoon carving first steps

This in effect makes the head and neck of the hen...

spooncarvingfirststeps+jonmac+kuksa+alehen+spoon+carving spoon carving first steps

Cut the underside to form the neck, and chop the bowl so as to sit a little lower than the head...

spooncarvingfirststeps+jonmac+kuksa+alehen+spoon+carving spoon carving first steps

And form the front of the bowl shape...

spoon carving first steps

Chop the unwanted section of the handle/head until you have a rough bird like silhouette...

spooncarvingfirststeps+jonmac+kuksa+alehen+spoon+carving spoon carving first steps

Once the Axe work is complete, set to hollowing out the bowl. The quicker this is done the better, as it will reduce the chances of the bowl splitting...

Cut across the grain to start...

spooncarvingfirststeps+jonmac+kuksa+alehen+spoon+carving spoon carving first steps

Once hollowed it is time to get the knife out and refine the shape...

spoon carving first steps

And carving the head...

spooncarvingfirststeps+jonmac+kuksa+alehen+spoon+carving spoon carving first steps

I have gone for a simple shape that represents the spirit of a Hen Goose...

spoon carving first steps

Almost there...

spooncarvingfirststeps+jonmac+kuksa+alehen+spoon+carving spoon carving first steps

Add some chip carved eyes ...


And singe her beak with a flame...

spoon carving first steps

A little decoration here ...

spooncarvingfirststeps+jonmac+kuksa+alehen+spoon+carving spoon carving first steps

and there ...

spoon carving first steps

and the Hen comes alive....

spooncarvingfirststeps+jonmac+kuksa+alehen+spoon+carving spoon carving first steps

I found this Kuksa shape a lot easier to carve than my usual beaver tail, and quicker to...

spooncarvingfirststeps+jonmac+kuksa+alehen+spoon+carving spoon carving first steps

I hope you enjoy making yours...

spooncarvingfirststeps+jonmac+kuksa+alehen+spoon+carving spoon carving first steps


ENJOY...


Tuesday, 17 May 2011

Hugginn and Muninn...Laburnum Shawl Pins...


spoon+carving+first+steps+spooncarvingfirststeps+bushcraft+carving  spoon carving first steps

I've been busy making more tuning pegs for Ben's larger Ngombi harp. He can now play happily without the harp de-tuning...
Once that job was finished I wanted to explore the possibilities of using little Hugginn and Muninn on a couple of shawl pins. 
The Saxon spoon I made some weeks ago with little Munninn sat on the end, was received very well, and stirred a lot of interest in people...

spoon+carving+first+steps+spooncarvingfirststeps+bushcraft+carving spoon carving first steps
 
And Sarah has finally finished her shawl.  
I had previously carved her a pin that looks a little like Odin.
Which gave me an idea...

spoon+carving+first+steps+spooncarvingfirststeps+bushcraft+carving spoon carving first steps

Hugginn and Muninn.

spoon+carving+first+steps+spooncarvingfirststeps+bushcraft+carving spoon carving first steps

Munnin...

spoon+carving+first+steps+spooncarvingfirststeps+bushcraft+carving spoon carving first steps

Hugginn...

spoon+carving+first+steps+spooncarvingfirststeps+bushcraft+carving spoon carving first steps


spoon+carving+first+steps+spooncarvingfirststeps+bushcraft+carving

I have carved these two pins from a billet of Laburnum. 
An incredibly hard and beautiful wood.

spoon+carving+first+steps+spooncarvingfirststeps+bushcraft+carving

 Coffee coloured on one side and cream on the other...

spoon+carving+first+steps+spooncarvingfirststeps+bushcraft+carving

 I used a flame to blacken one of them...

spoon+carving+first+steps+spooncarvingfirststeps+bushcraft+carving

 And left the other one natural in colour...

spoon+carving+first+steps+spooncarvingfirststeps+bushcraft+carving

I started carving the first pin using a MaChris made from 01 steel and found that the 01 is a little fragile for this tough wood.
The result was micro sized chips on the cutting edge. 
So I bought out the big guns...A MaChris carving knife made from Silver Steel.
(  BS-1407 ) 
This hard steel coped with the Laburnum without a murmur...

spoon+carving+first+steps+spooncarvingfirststeps+bushcraft+carving spoon carving first steps

One of these may be travelling up the road in a few days...

spoon+carving+first+steps+spooncarvingfirststeps+bushcraft+carving

 I'm not sure if I will have to post them or whether they will make the journey under their own steam...

spoon+carving+first+steps+spooncarvingfirststeps+bushcraft+carving

I've also been finishing of  a basket of Kuksa blanks...

spoon+carving+first+steps+spooncarvingfirststeps+bushcraft+carving

 And I have also made myself a new spoon from a nice piece of Apple...

spoon+carving+first+steps+spooncarvingfirststeps+bushcraft+carving spoon carving first steps


spoon+carving+first+steps+spooncarvingfirststeps+bushcraft+carving spoon carving first steps

This one is staying in my kitchen...

spoon+carving+first+steps+spooncarvingfirststeps+bushcraft+carving spoon carving first steps

Well...I have to get working on putting sharp edges on my knives and Axes as I have a couple of chaps arriving at the end of the week for a Kuksa carving course. I am thoroughly looking forward to introducing another couple of people to the carving/Bushcraft world...

spoon+carving+first+steps+spooncarvingfirststeps+bushcraft+carving spoon carving first steps

Happy Days...
Enjoy...J

Carving a Dragon Kuksa.

Carving a Dragon Kuksa.  I have been carving Kuksa from green Birch for 15 years or so, I’m self taught. From the beginning, I limited mysel...