Tuesday, 17 April 2012

Endicotts Army Surplus...The Endicott Norwegian Strip av lerret. (or the Zeltbahn justification) ...


ENDICOTTS
shop_pix_army_surplus
EST. 1937

 endicotts army surplus spoon carving first steps

 Sarah and I travelled to Exeter during the spring vacation and visited our friend Kevin in his shop.
This has to be the best little shop of it's type I have ever known.

endicotts army surplus spoon carving first steps

Kevin sells all manor of equipment for use in the great outdoors.
I have been a customer at his shop for twenty years or so and used to buy equipment for heavy use when I was a S.A.R. Team member.

endicotts army surplus spoon carving first steps

In the past I have spent many months at a time abroad,  living under the stars using equipment from Endy's.

endicotts army surplus spoon carving first steps

This guy has been hanging around for a long time now.
Probably related to this chap...

endicotts army surplus spoon carving first steps

 Kevin and his assistant Paul are always busy serving customers or packing up kit for mail order.

endicotts army surplus spoon carving first steps


endicotts army surplus spoon carving first steps

On this visit I bought some O.G Lightweight trousers and placed an order for some good quality summer boots. Which means I'll have to make another visit...J;-)
I also found an interesting roll of canvas marked (tent).
I had a look at it in the shop and decided to buy it.

endicotts army surplus spoon carving first steps

It's a Norwegian ' Strip av lerret'.
It's better known using the German word for it. 
 Zeltbahn.

endicotts army surplus spoon carving first steps

It's a shelter sheet, poncho and an individual part of a bigger tent.
The idea being that you can button two, four, eight, twelve or sixteen of these sheets together to make larger group shelters.

endicotts army surplus spoon carving first steps

A bit odd looking I must admit,  I bought mine to wear in the evenings by an open fire, I figured it would keep a breeze at bay and not melt at the first hint of a spark.
It can be folded and worn in many different arrangements.
It is also long enough to use with my very long hammock.

endicotts army surplus spoon carving first steps


endicotts army surplus spoon carving first steps

You can just make out the instructions printed on the Zelt for constructing larger tents.

endicotts army surplus spoon carving first steps

I figured that if I were to use this sheet other than a windcheater I had better improve its waterproof qualities.
I hung it up in the garage and gave it a liberal coating of 


It does what it says on the tin.


This treatment can darken the colour of the canvas, on this occasion there was little change.
Whatever you do...
Do not use this treatment on modern carbon based material.
It will dissolve  !!!


Well, if these clouds are anything to go by, it looks like I'm going to need my new bit of kit to keep the weather off.

spoon carving first steps

You can call Kevin on 01392 433331
Or visit his site at...

Endicotts Military Surplus and Outdoor Survival Equipment.
2 West Street
Exeter
Devon

EX1 1BA


Sunday, 8 April 2012

Shales...


spoon carving first steps

I have been having a great time recently with my carving, I have also been out and about with some good friends.
Mark gave me a call and suggested we took a day out and had a rummage round one of the forests here a bouts. He wanted to practice a little tracking and he also had an interesting geological anomaly that he thought would interest me.


The early morning was crisp with frost as we moved through the landscape.
We found a woodpecker's larder...


And some Red Deer droppings...


 And a place where a small rodent had consumed his stash of haws next to it's tiny home.


We stopped for a brew using one of Marks fangled folding fire boxes.

spoon carving first steps

I used a flint and steel to light it...

spoon carving first steps

Mark produced from his Bergen a couple of packets of wet meals, I chose chilli, it was very good. I'll post some information about them later.


Well eventually we found the anomaly...
I selected a few pieces and took them home.
I have tried to find out exactly what type of stone this is, I think it's a fine clay shale.
I dressed the shale on a flat brick using plenty of water and then finished the job with my King dressing stone.

machris spoon carving knife spoon carving first steps

It is good to know that with a bit of knowledge and a keen eye I can find a suitable stone for sharpening my carving knives. This clay shale is about 10000 grit, nice and fine.

machris spoon carving knife spoon carving first steps

Polishing up one of my MaChris bushcraft knives.

machris spoon carving knife spoon carving first steps

Well, with all this sharpening I guess I had better carve something.

machris spoon carving knife spoon carving first steps

Job done.

machris spoon carving knife spoon carving first steps

Enjoy...J


Saturday, 31 March 2012

Spoon carving students...


spoon carving first steps

Once Dolly got her head out of my Tupperware I got going with a bit of sharpening, a bit of chopping and a bit of carving...

spoon carving  spoon carving first steps

We are having some wonderful weather here in Devon.

spoon carving  spoon carving first steps

The Blackbirds have been pairing up and we have a few couples building nests close to the house. The boys are in a fighting mood, but they seem to rub along .

spoon carving kuksa spoon carving first steps


spoon carving kuksa spoon carving first steps

I've been busy with my new axe making kuksa and spoons.
And the Black birds have given me some inspiration.

spoon carving kuksa spoon carving first steps


spoon carving kuksa spoon carving first steps


spoon carving  spoon carving first steps


spoon carving  spoon carving first steps

I was asked by my friendMark Lane if I could take a group of his students from Embercombe and teach them the rudiments of spoon carving.
These students are all volunteers and have very little in the way of money, but lots in the way of enthusiasm and determination. They duly arrived bearing things with which they could trade for a day with me and Dolly;
locally made cider, wine and lots of vegetables from their allotments up at Embercombe.


We started the day with some axing techniques. I would recommend to anyone who is just starting with axe work to go buy some 6 inch nails and practice, with a hammer, gently knocking them in. This will help, to a certain degree, with your accuracy.
Once our blanks were chopped we moved on to some knife techniques.
Luckily I have a few MaChris knives that I could share with my students.

spoon carving  spoon carving first steps


spoon carving  spoon carving first steps


spoon carving  spoon carving first steps


spoon carving


spoon carving  spoon carving first steps


spoon carving  spoon carving first steps


spoon carving  spoon carving first steps


spoon carving

Lunchtime bought a wonderful Chick pea curry made by the students, we moved indoors as it began to rain a little.

spoon carving  spoon carving first steps

Earlier in the day we had to borrow Dolly's personal stump. She was not a happy chicken, when we finished with the axes we put her stump back in the studio...Where it belongs....J;-)

spoon carving

They all did very well learning new skills, I'm sure we will see there spoons on show in the future.

spoon carving  spoon carving first steps


We all had a great time carving and chatting. I will visit Embercombe soon and give the students some sharpening tuition. Looking forward to another curry...

Enjoy...J


Tuesday, 27 March 2012

Spoon carving with a new Axe...


spoon carving axe spoon carving first steps

I recently got in touch with Sean Hellman and asked if he wouldn't mind selling me one of his fine Granfors Brucks carving axes. I have been interested in this axe for quite some time now. 
Sean seemed quite keen on the idea and drove up to my home one Sunday afternoon. Sean and I had a great time swapping yarns about this that and the other, and he duly demonstrated the axe over a cup or two of coffee. 
It didn't take long for me to see that this might be a good addition to my arsenal. 
This axe is in no way a bushcraft tool. I have bought it purely for spoon and kuksa carving.
I wanted an axe with a slightly heavier head that would be suitable for splitting out waste wood as well as finer carving, a faster axe in fact.
Here's what Brucks have to say about it...


Swedish Carving Axe
A chop axe for hewing bowls and other wooden objects, artistic wood carving and architectural work. The characteristic curved shape of the cutting edge, carried well above the head's eye, the position of the edge in proportion to he handle, the rather thick bit and the big angle of the wide beveled face makes this axe a good carving tool. You "cut on the beveled face" with curved movements. This new axe pattern, based on old Swedish carving techniques, was developed by Wille Sundqvist, master craftsman and author of "Swedish Carving Techniques" in cooperation with craftsman adviser Onni Linnanheimo. The handle is "rugged" to give a good grip.
The axe has a 4 1/3" face and a 14" hickory handle and the head weighs 2 lb. It comes with a grain-leather sheath...


Now I've had a good old play with it, I think I can explain why the toe of the axe is higher than the eye.
It's all to do with being able to turn the axe out of a cut. You may wish to do this when cutting out the back of a curved spoon handle or the neck of a goose or kuksa.
Here is a photo of me cutting the back of a kuksa using the middle of the cutting edge. As you can see, if I wanted to turn out of this cut, the poll of the head would foul the work piece.

spoon carving axe spoon carving first steps

However, if I cut using the fine toe of the axe I can turn the cutting edge out without fouling the poll against the work.

spoon carving axe spoon carving first steps

And from above...

spoon carving axe spoon carving first steps

You can see that I can swing the head past the work, this enables me to slice finer curves than I would be able too with a Standard axe head shape.
So far so good.
I also like the way I can cut using a rocking motion, much like a clog knife.
Here I'm using the toe...

spoon carving axe spoon carving first steps

spoon carving axe spoon carving first steps

And I can use the heel of the bit in the same fashion.

spoon carving axe spoon carving first steps

spoon carving axe spoon carving first steps

All in all I am thoroughly enjoying my new addition and I would highly recommend giving Sean a call.
But don't worry bushcraft folk, this isn't the sort of axe that could usurp the H.Roselli for all round versatility...

Enjoy...J


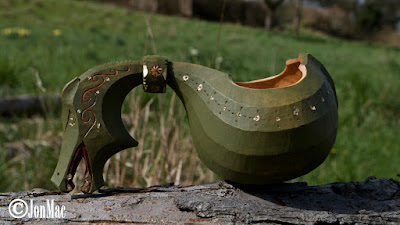
Carving a Dragon Kuksa.

Carving a Dragon Kuksa.  I have been carving Kuksa from green Birch for 15 years or so, I’m self taught. From the beginning, I limited mysel...