Wednesday, 12 October 2011

Where spoon carving and chickens colide...


kuksa spoon carving spoon carving first steps

 Sarah is having one of those birthday things. I panic at this time of year because I still haven't managed to save enough to buy her a Roller. 
Instead I will cook her a splendid meal and present her with some smaller gifts.
A friend made a visit the other week, he came with a small chicken under his arm. 

spoon carving first steps

 He told me the chicken had been picked on by the White Sussex that make up the majority of the flock. This can happen sometimes and the only thing to do is remove the bullied chicken.
I agreed to take her in and spent the next day observing her as I worked on one of Sarah's presents. Her crop was full and fit to burst, but her droppings were peculiar as they consisted mainly of grass. I came to the conclusion that the other birds had kept her from the chicken feed and she was crop bound with grass. This is dangerous, if nothing is done she will starve.
I set about syringing Olive oil down her throat and massaging her crop in the hopes I could loosen things up. I fed her Honey water for her strength. 
Well, over the next two days she got weaker and weaker until I thought she would shed her mortal coil and go meet the choir invisible. I resorted to an old wives tale and gave her a tiny amount of Eau de vie....Kill or cure.
 
spoon carving first steps

 The morning arrived and she was up and about. We were so pleased.
Well, I set to feeding her baby food via a syringe, she seemed to like this as she would open her beak ready for the orange coloured mush.
After a lot of care she is now getting her strength back and follows me around the ground floor making chickeny noises.
After consulting one of our good friends who lives in the smoke up country, we decided to call her...
'Choti Bop Bop'
Choti is 'Urdu' for little, and the Bop Bop I added as that is her call...

spoon carving first steps

She is still quite weak but I'm sure she will make a good recovery.
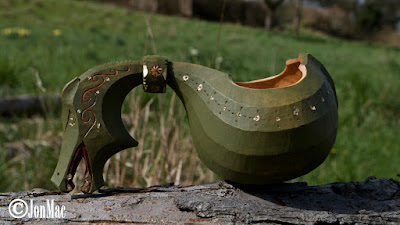
She has been watching as I make a special present for my Sarah...

kuksa spoon carving spoon carving first steps

  I think she will love it...

kuksa spoon carving spoon carving first steps

I may not need to buy a Roller after all...

kuksa spoon carving spoon carving first steps

I guess the simple things are the most beautiful...

Enjoy...J;-)


Monday, 26 September 2011

Autumn foraging and Gateau Aux Marrons...


spoon carving first steps

Autumn has arrived up here in the hills. 
The weather has been a mixture of wet and warm days with chilly nights....

spoon carving first steps

 Autumn smells purvey the forest...

spoon carving first steps

The last of the summer sun glints through the turning leaves...

spoon carving first steps

In between carving and looking after our chickens I have spent some time foraging about for some Autumn treats...

spoon carving first steps

I have found quite a few Leccinum scabrum (Birch Bolete).
These are processed by carefully removing the pores from the upper flesh...

spoon carving first steps


spoon carving first steps

Leaving the edible flesh ready for cooking or drying...

spoon carving first steps

Slice the caps into slim strips with a sharp knife...

spoon carving first steps

I personally dry these morsels on kitchen paper left on a light windowsill. But I have been told by an old friend of mine that threading them onto a length of cotton and hanging over a heat source, a Rayburn for instance, is the way to go...
The Birch Bolete and other types of Bolete are a nice addition to any stew or soup.
But it is not my favourite.
Some years ago my French friend 'Alain' took me mushrooming up in the hills above his cob cottage in the South of France. He introduced me to, in my opinion, the most wonderful mushroom....
(Cantharellus cibarius.)
CHANTERELLE....

spoon carving first steps

These butter yellow mushrooms are delicious.
I remember a long hard ride on my old sidecar from the French Alps to Alan's home in the southern part of France. I arrived at his home and was given a super warm welcome from both Nathalie and Alain.
They sat me down at the ancient table in their living room and fed me a meal fit for the most weary traveller.
These simple ingredients will delight the taste buds.
Chanterelle.
Fresh eggs.
Butter.
Salt.

spoon carving first steps

Heat the butter in a pan and add the Chanterelle and salt, gently fry, add eggs and whisk.
Serve with bread and wine...


An absolutely delicious meal...
I've also managed to collect a quantity of Cob nuts and plums...

spoon carving first steps

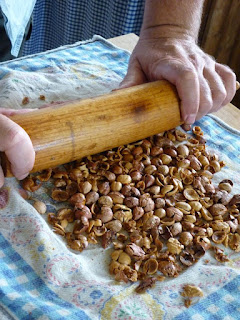
The Cob nuts need releasing from their shell. A tap with the poll of your Axe or a baton will crack the hard shell open...

spoon carving first steps

Once you have them released from their shells they are ready to eat...

spoon carving first steps


spoon carving first steps

I like to roast mine...Remove the shells and pop them in an oven at about 150 degrees for a couple of hours. This should dry them and make them a little crunchy, also improving the flavour...
Sarah and I have a super recipe in which we use roasted Cob nuts...

GATEAU AU MARRON...


For this recipe you will need...
Roasted Hazelnuts....
8oz (225 g) Plain chocolate, chopped.
8oz (225 g) Butter, softened.
8oz (225 g) Unsweetened Chestnut purée.
8oz (225 g) Caster sugar.
1-2 Tablespoons Rum/Cognac.
To Decorate- grated chocolate, or cocoa powder and icing sugar...

Rub the roasted Cob nuts together to release the papery skins. Winnow out the skins by blowing over the tray.
(Outdoors is best)


Place the chocolate in a bowl over a saucepan of hot, not boiling, water and leave until the chocolate starts to melt. Stir the chocolate until it is smooth, then remove from the heat...

spoon carving first steps

Crush the Cob nuts...


spoon carving first steps


spoon carving first steps

In another bowl, beat together all the remaining ingredients, except the grated chocolate or cocoa powder and icing sugar...

spoon carving first steps

Stir in the chocolate...


Add the roasted and crushed Cob nuts...

spoon carving first steps

then spoon into a loaf tin or ring mould...

spoon carving first steps

Cover and leave in the refrigerator over night....
To Serve.
Dip the tin or mould briefly in hot water, place a plate over the tin or mould then, holding the tin or mould and the plate firmly together, turn them over and give a sharp shake. Lift the tin or mould away.
Sprinkle grated chocolate or cocoa powder and icing sugar over the top and serve sliced.

spoon carving first steps

ENJOY...J

We know you will...J;-)

Friday, 23 September 2011

Dartmoor Mountain Rescue 'A'sec (S.A.R) Grand opening...

 
The Members of Dartmoor Search & Rescue Team (Ashburton) would like to invite members of the public to The Grand Opening of their new Base and HQ from 14:00 on Saturday 24th September.

The Abbot of Buckfast Abbey will preside over Ribbon Cutting at around 14:15, after which there will be an opportunity to look around our new home, meet the
Team Members and discover more about what we do. Refreshments will be
available.

The base is situated at grid SX745677 at Furzeleigh on the old A38 between Buckfastleigh & Ashburton.
We look forward to seeing you all there!

Tuesday, 20 September 2011

Spoon carving and spatular making with the Endy Kids...

Kevin, Jenine and the three Endy kids came up for a 'Mac-cation' last weekend. Kevin and I wanted to chew over some ideas and we also wanted to introduce the children to some spoon carving knife holds and techniques. Kevin told me he had taken the kids to the Wilderness gathering and they had been taught simple knife safety amongst other things. By all accounts they had a great time at the gathering and Kevin's business went well. He kept selling out of equipment and made many trips back to Endy central for re-supply. Well it looked like the children had been taught well, as they all understood about how to pass a knife and how to keep the blade away from danger areas on the body.
I thought a simple shape would go down well with the children so I decided to make a spatula with them.
We started the morning with a little music. I have played a mouth harp since I was about seven years old. A good friend of mine lent me a harp made in East Africa... We all had a go...

spoon carving first steps

The instrument consists of a bent stick and a tough strip of rattan. You hold the instrument across your mouth whilst tapping out a rhythm with the stick. I have had a cast about to try and find something on You Tube to give you an idea of what it sounds like. Can't find anything on this particular harp, so I'll post a recording here some when soon...

spoon carving first steps

 I wanted to keep the project simple. I split down some Birch with my Leuku...

 spoon carving

I don't usually pencil in the shape of my spoons, but I thought in this case it would make the process a little easier. I used a spatula I had made some years ago as a template...

spoon carving

Once the children had decided on the general shape of their spatula I set them off with some of my smaller knives... We used a variety including a short 'Frost', a 'Roselli' carpenters knife and a 'Mini MaChris' or 'MiniMac' as we like to call it. Of course 'Dolly' helped out as well...

 spoon carving


 spoon carving

Amelia gently lets in the handle...

 spoon carving


 spoon carving

Sophia wanted a pointy end with which she could poke the sausages...

spoon carving

I cant tell you how much fun we had. The kids were only too happy to work and listen to instruction, it was a pleasure teaching them...

spoon carving

Even little Isaac or 'Badger Man' had a go, with dad's help...

spoon carving

I think he preferred swinging in Sarah's swing seat though...

spoon carving first steps

Kevin came up with some funky designs for their makers mark...

 spoon carving

Which I burned on with a soldering iron...

 spoon carving

I thought I had better make one of my own...

spoon carving

I decided to carve a little raven helper on mine...

 spoon carving

We cooked some sausages on a fire for lunch and the children had the opportunity to use their spatulas...

 spoon carving

Every body left full of sausages and Sarah's cakes.
Sarah and I look forward to the next Endy visit...
Enjoy...


Carving a Dragon Kuksa.

Carving a Dragon Kuksa.  I have been carving Kuksa from green Birch for 15 years or so, I’m self taught. From the beginning, I limited mysel...